Tag Archives: self-driving car

From Wall-Following to Full Autonomy

By Wenchao Liu

When I was a happy college student at Lawrence, I made a wall-following RC car. The project was truly a blessing, because it led me to many amazing people such as Prof. Stoneking and Angela. My theoretical-physicist-turned-computer-scientist professor, Prof. Gregg, helped me a lot during the process as well. My presentation day was one of my proudest days, as I was showing a room of my professors that I was actually not that dumb. 

It’s been a year since that presentation day, and I am still living in the past. Currently I am building the second version of the car, following instructions on f1tenth.org. The second version has quite a few improvements over the first one, and I have learned quite a lot so far. This post is about such improvements and what I plan to do in the future. It’s like the project proposal I gave in college, which wasn’t fully executed.

The most obvious improvement is a mechanical one. The previous build has two layers of plastics, which are connected also by plastics. As a result, the build is not rugged and glue was frequently applied. The new build has only one layer of plastics, and it’s mounted on a lower level than the base layer of the old build.

Just One Layer!

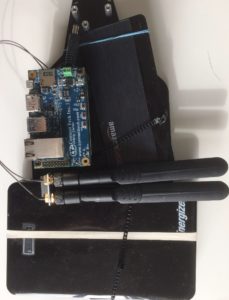
The electrical improvement is less obvious, but still visible. I had to changed the brushed motor to a brushless one, and to buy a VESC to control that. Thus, a Teensy micro-controller is not longer needed, as the computer can just control the VESC directly. The second build also uses an Orbitty carrier board, which has a smaller form factor than the previous one. Form factor; what a jargon word!

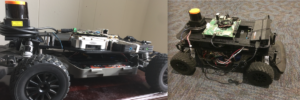
Can you tell which one is the current one?

The software improvement is not even visible as all, but it’s always been most frustrating. Although the only functionality I had with the previous build was wall-following, the car could actually do a lot more. The main functionalities I am trying to implement now are mapping with Lidar, localizing the car, generating and following waypoints. That’s where the f1tenth.org stops, but I won’t stop learning for a long time!

Stay tuned!

Wall-Following RC Car

By Wenchao Liu

When I was a junior, I decided that I’d work on autonomous vehicles after graduation. However, as an undergraduate, I’d not be able to produce a research paper in the field. Thus, I dedicated my senior experience to building a self-driving RC car, which was within my reach. Calling it self-driving might be a stretch, since the only capability for the car was wall-following. However, the project really took me a lot of time and energy.

The first step was to build a platform where the electronics could stand. There were a lot of electronics that needed to be on the RC car, and they couldn’t just be taped on the top. Thus, I paid someone to use a laser cutter to cut out different parts of the platform from two pieces of plastics. After assembly, the electronics could safely be placed on top of the RC car. The Makerspace doesn’t have a laser cutter, but Angela purchased one on back order, so we’ll see when we will get it!

The second step was to put the electronics securely on the platform. That process requires a lot of screws, standoffs and even fasteners! In addition, I had to solder a lot of circuits and headers in the Makerspace. There are many useful communal tools in the Makerspace, such as a soldering iron, screw drivers and various types of glue! On top of that, Angela, who is in charge of the Makerspace, is also helpful and wiling to buy almost whatever tools you want! She also has great ears to listen to your complaints when things go south!

The final step was software. I used ROS on Ubuntu to analyze the data from the Lidar, and to send commands from the computer to the micro-controller. The computer uses the Lidar data to estimate the distance between the car and the wall. If the car is too far away from the desired distance, the computer tells the micro-controller to steer closer, and vice versa. How much should the car steer? Well, that is handled by a PID controller, which takes the off-set from the desired distance and outputs the steering angle.

Wenchao and his friend Sheila (not Angela)

In total, the project took me about half a year. I took a class on Arduino in the chemistry department in the spring term of my junior year (yes, chemistry!) and worked on the project through the following summer and fall. During the entire process, I spent quite some time in the Makerspace, complaining to Angela! When the project was finished, I gave a talk about it, and many people came, including Angela! Look at how much she aged after listening to all my complaints!