Category Archives: Assignments

3D Printing and Science: Designing and Printing Biomolecular Models

Adenovirus

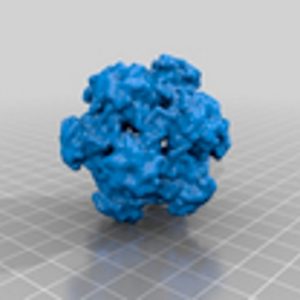
Adenovirus from the Infectious Pathogens collection in Lux.

3D Models of viruses, proteins, and other biomolecular objects have many awesome uses. They can be used for conducting research and figuring out problems and processes. They can also be used for teaching students what these objects look like on a magnified scale to obtain an understanding of how they’re made and how they interact.

There are many excellent resources that instruct how to create these models, 3D print them, and use them in classroom settings. Here are a few:

  • The article, “3D Printing of Biomolecular Models for Research and Pedagogy,” by De Veiga Beltrame, et al, describes the benefits of using these models, and provides “a guide on the digital design and physical fabrication of biomolecule models for research and pedagogy.” In addition to the article,  they’ve produced a supplementary video.
  • NIH 3D Print Exchange contains 3D printable files of many, many scientific models and equipment, and tools.
  • UCSF Chimera an Extensible Molecular Modeling System: According to their website, Chimera is a “program for interactive visualization and analysis of molecular structures and related data.” It also includes documentation to help get started.
  • Dr. Dave Hall from Lawrence University’s Biochemistry department has created collections of infectious pathogens and protein domains that can be downloaded and printed, and includes instructions on how to create these models with each collection.
  • Just for fun (and science), the game Foldit not only teaches about protein structures and behaviors, but also provides its players with an opportunity to contribute to scientific research through gameplay!

Archimedes and 3D printing

Archimedes was a Greek mathematician born around 300 BC. He is well-known for his “Eureka!” moment. Supposedly, he had an epiphany about volume displacement in the bath, shouted “Eureka!”, then ran naked through Syracuse.

A sphere circumscribed in a cylinder. Source: Wikimedia Commons

A lesser-known story involves another of Archimedes’ discoveries. He proved that the volume of a sphere circumscribed in a cylinder is two-thirds the volume of that cylinder. As the story goes, he was so proud of this theorem that he requested to have his tomb adorned with a sculpture illustrating its proof. In 2013, some researchers 3D printed a “drinkable proof” of this theorem. Their project involved a half-sphere, a half-cylinder, and a cone. I decided to do something similar, but with a whole sphere and a whole cylinder.

1: A cylinder and a sphere in Tinkercad. 2: Fusion 360 gives users more freedom.

Tinkercad is a user-friendly 3D design program that gives you pre-made shapes to manipulate while designing. Its spheres and cylinders do not have perfectly rounded sides, so I decided to use Autodesk Fusion 360. Fusion 360 gives you more control over your design, if you know how to use the tools. My suggestion for other beginners is to open up Fusion 360 next to an online video tutorial, and follow along. The Autodesk Fusion 360 channel is a good place to start.

I printed a sphere with a small hole at the top and an open-top cylinder. If you fill the sphere with water, then pour the water into the cylinder, it will fill up exactly two-thirds of the cylinder. I decided to experiment with clear filament, so that the water line would be visible from any angle.

Translucent effect from 0.8mm nozzle, solid infill.

I tested how well my objects prove Archimedes’ theorem, and learned something about physics in doing so. I filled the sphere with water, but when I tried to pour it into the cylinder, the water did not come out. In short, the air pressure outside the sphere is greater than the air pressure inside of it. When the sphere is full of water, there is no air to “push” the water out, so it defies gravity, and stays inside the sphere.


Differences in air pressure kept the water from coming out of the sphere.

With a bit of shaking, I was able to get the water out, and it filled up two-thirds of the cylinder.

Exploring Cura with a Minotaur

Cura is a slicing software that prepares models for 3D printing. Over the past two weeks, I have used a minotaur named Manus to gain a better understanding of Cura.

Cura has hundreds of settings, and luckily, the default settings work pretty well for most objects. However, it is time-consuming to print a large object multiple times just to get the settings exactly right.

Manus is only 40 millimeters tall, so I printed nine different versions of him to create a visual array of Cura’s different settings. I experimented with print quality, print infill, nozzle width, and support.

This screenshot shows Manus along with Cura’s default settings on the right hand side.

Print Quality

A true indicator of print quality is the “smoothness” of the final product. 3D printers work layer by layer, and smoothness depends on layer height. The thinner the layers, the smoother the object. A fast print creates 0.15 mm layers, a normal quality print creates 0.1 mm layers, and a high quality print creates 0.06 mm layers. In my experiment, the difference in quality is most visible is Manus’ eyes.

From left to right: fast print, normal quality, and high quality.

Print Infill

Cura provides a mesh filling for all 3D models. An object’s stability and total print time depend on the density of this filling . Cura has four primary infill options: hollow, light, dense, and solid. Light, the default setting, is 20% infill. Dense is 50% infill.

Left: dense infill. Right: hollow infill.

Nozzle Width

A 3D printer’s nozzle is the pointed metal piece on the print head from which filament is extruded. Ultimaker provides users with a kit containing the different nozzle variations, along with a small wrench to exchange them between prints.

The Ultimaker nozzle kit.

The wider the nozzle opening, the thicker the layers, and the more material that can be extruded at once. At two hours and fourteen minutes, the Manus printed with the 0.25 mm nozzle was the longest print, and also the most successful. The Manus printed with the 0.8 mm nozzle only took 18 minutes.

From left to right: 0.25 mm nozzle, 0.4 mm nozzle, 0.8 mm nozzle.

Support

If a model has an overhanging part, support structures are needed. Otherwise, the printer will attempt to print into thin air, which is not possible. Manus is small enough that he does not need support structures, but his head and horns hang over his body, so the some of the models with no support structures had jagged chins.

Left: supports allowed everywhere. Right: supports allowed on buildplate only.

3D Printing and Ceramics

The final product.

Printing Meghan’s face.

It’s always exciting to see 3D printing and scanning in use with a new discipline on campus, so we were so happy to help Meghan Sullivan, Uihlein Fellow of Studio Art, try out a new project in the makerspace. Meghan had the idea of creating a 3D image of her face to use in ceramic design. The process in the makerspace was pretty straightforward once we figured out the nuances of our 3D scanner and software.

  1. Scanned Meghan’s face (we used the Scanify 3D scanner)
  2. Exported an STL file that could be 3D printed from the Studio 3D software. The Advanced version of the software is required to do this, since the option to volumize the file is necessary.
  3. Sliced the file in Cura, then printed it in the Ultimaker 2+.
  4. After it was printed, Meghan used the 3D printed object to create a mold.
  5. The mold was used to create a clay object.
  6. The clay object was then fired, painted, and glazed.

Meghan plans to have her ceramics students replicate this assignment in the future.